 By Claire Whitaker
Updated November 2026
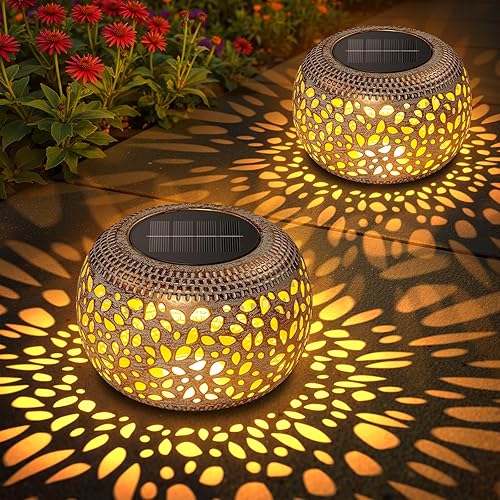
Tuffenough solar outdoor lights are a practical way to light a walkway, patio, or garden without running wiring. This guide explains how these lights charge, where to place them for the best results, how to set them up, and how to troubleshoot when they dim or stop working. By the end, you will know how to get more hours of light out of each fixture.
How Tuffenough Solar Outdoor Lights Work
Most solar landscape lights, including those sold under the tuffenough name, follow the same basic design. A small photovoltaic panel on top converts sunlight into electricity during the day. That energy is stored in a rechargeable battery, usually a nickel-metal hydride or lithium cell, inside the stake or body of the fixture. A light sensor tells the circuit when to switch the LED on at dusk and off at dawn, or after a set period.
Because everything is self-contained, performance depends on three things: how much direct sun the panel gets, how healthy the battery is, and how efficient the LED driver is. Understanding those three variables makes troubleshooting much easier.
Key components to know
- Solar panel: Usually a small monocrystalline or polycrystalline cell mounted on the top or face of the fixture.
- Battery: A rechargeable cell that stores daytime energy. Capacity is often listed in milliamp-hours (mAh).
- LED module: The light source. Many models use warm white LEDs for a softer glow.
- Light sensor (photocell): Detects ambient light and controls the on/off cycle.
- Mode switch: Some units offer constant-on, motion-activated, or dual-brightness modes. Check the manual for your specific model, since mode labels vary.
Step 1: Choose the Right Location for Maximum Charge
Placement is the single biggest factor in how long your tuffenough solar outdoor lights run each night. The panel needs direct sun, ideally for six or more hours per day. Partial shade from a fence, tree, or the side of the house can cut charging time dramatically.
Before you push any stake into the ground, watch the spot for a full day. Note when the sun clears nearby objects in the morning and when shadows return in the afternoon. A spot that gets strong sun from late morning through late afternoon is usually the best choice.
Placement checklist
- The panel faces south in the Northern Hemisphere (north in the Southern Hemisphere) or receives the most direct sun.
- No overhanging branches, eaves, or fence tops cast shadows on the panel between 10 a.m. and 4 p.m.
- The light stake sits within the distance your model’s specifications list for the light spread you need.
- The ground is firm enough to hold the stake upright. Soft soil may let it lean over time.
- The spot is away from sprinklers or heavy runoff, which can damage the housing and the battery compartment.
Tilting and angling the panel
If the fixture has an adjustable head, angle the panel toward the sun’s midday path. In most of the continental US, a panel tilted to roughly your latitude collects more energy across the year than a flat one. Many owners find that a simple 30-degree tilt in winter and a flatter angle in summer works well, though you should only adjust heads that are designed to move.
Step 2: Prepare the Fixtures Before Installation
Good preparation prevents most early failures. Start by removing the protective film from the panel if your model came with one. Many owners overlook this, and the film alone can cut charging output noticeably.
Next, check the battery. Most tuffenough-style lights ship with a battery already installed, but some use a separate compartment that may have a plastic tab to prevent discharge during transit. Remove that tab and confirm the battery is seated firmly with the correct polarity.
Initial charge
Place each light in full sun for one to two full days before expecting a full overnight run. This first charge gives the battery a complete cycle and helps you spot any dead units before you commit to a layout. Turning the light on by hand during this period is generally fine, but check the manual, since some models should be left in auto mode.
Step 3: Install the Lights Correctly
Installation is simple, but a few details make a difference in durability and brightness.
- Mark the spots you want to light with small flags or spray paint. Walk the area at night to confirm the layout before digging.
- Push the stake into the soil until the panel sits at the height the manufacturer recommends. Avoid pounding directly on the top of the fixture, which can crack the housing. Pre-dig a small hole in rocky soil.
- Make sure the light head is level and facing the path or area you want to illuminate.
- Tighten any adjustment locks or screws, but do not overtighten plastic parts.
- Test the light by covering the panel briefly. It should switch on within a few seconds in normal auto mode.
Spacing for even light
Spacing depends on beam width and the brightness you want. As a general planning guide, many path lights are spaced 6 to 10 feet apart so the pools of light overlap slightly. Brighter flood-style units can cover wider areas. Use the spacing guidance in your product manual as the starting point, then adjust after a test night.
Step 4: Maintain Performance Through the Seasons
Solar outdoor lights need only light upkeep, but neglect shows up quickly as dimmer output or shorter run times.
Wipe the panel and lens every few weeks with a soft cloth and mild soapy water. Pollen, bird droppings, road grime, and hard-water spots all reduce the light that reaches the cell. In dusty or leaf-heavy areas, a monthly wipe is a good habit.
Trim grass and shrubs that grow up around the fixture. A plant that shades the panel for only an hour a day can reduce total charging time more than most people expect.
Seasonal adjustments
| Season | What changes | What to do |
|---|---|---|
| Spring | Trees leaf out and cast new shade | Trim branches, check the panel angle, and clean the lens |
| Summer | Long days, but grass grows fast | Keep vegetation cut back and check the stake for loosening |
| Fall | Leaves fall and cover panels | Sweep debris off daily or weekly during heavy drop |
| Winter | Short days, lower sun angle, snow cover | Clear snow from panels and expect shorter run times |
Battery care
Rechargeable batteries wear out over time. Many solar lights last one to three years before runtime drops noticeably, though heat and frequent deep discharge can shorten that. If a light that once ran all night now fades after a few hours, the battery is the most likely cause. Replace it with a battery of the same size, voltage, and capacity listed in the manual. Mixing chemistries or using a mismatched cell can damage the circuit.
Troubleshooting Common Problems
When a light stops working, work through the causes in order from easiest to hardest to fix.
- Check the panel. Clean it and confirm no shade or protective film is blocking it.
- Check the mode. Make sure the switch is in auto mode, not off or manual.
- Check the sensor. A photocell covered with dirt or placed too close to another light may stay off or stay on all day.
- Check the battery. Test whether it holds a charge and seats firmly.
- Check the LED. If the light glows faintly from a fresh battery in full sun, the LED module may have failed.
Many light-related issues are similar across brands, so the same checks often work whether the fixture is a path light, a spike light, or a wall-mount unit. For a broader look at why solar lights underperform, see Why Are My Outdoor Solar Lights at Menards Not Working? 6 Fixes, which walks through many of the same symptoms.
Common Mistakes
- Placing lights in partial shade. Even a few hours of shade a day can cut runtime noticeably.
- Skipping the initial charge. A light set out at dusk on day one may run only briefly.
- Leaving protective film on the panel. It is easy to forget, and it lowers output.
- Overtightening plastic parts. Cracked housings and stripped threads are common results.
- Mounting too close to a porch or wall light. The fixture’s sensor may read the other light and stay off.
- Using the wrong replacement battery. A cell with different voltage or chemistry can damage the circuit.
Tips for Better Results
- Group lights in the same zone so their brightness levels look consistent.
- Use a few brighter lights at key points, such as steps or corners, and softer lights along the path.
- Mark the fixture positions with pavers or edging so you can find them after mowing.
- Keep a spare battery on hand if you have many units, so a failed cell does not leave a dark spot for weeks.
- Test your layout on a clear night before finishing the installation.
Recommended gear
Several inexpensive tools make installation and upkeep easier. These are general supplies rather than tuffenough-specific parts, so check compatibility with your fixture size before buying.
- Garden stake driver or rubber mallet: Lets you seat stakes without cracking the top of the fixture. View on Amazon
- Soft microfiber cloth: Cleans panels and lenses without scratching the surface. View on Amazon
- Nickel-metal hydride AA rechargeable batteries: Useful for keeping spares on hand for units that take AA cells. Confirm your model’s battery type first. View on Amazon
FAQ
How long do tuffenough solar outdoor lights stay on each night?
Runtime depends on charge level, battery health, and mode. A fully charged light in a sunny spot often runs most of the night, while a shaded or aging unit may shut off after a few hours. Check your specific manual for rated hours.
Why do my solar lights turn on during the day?
This usually means the light sensor is blocked, dirty, or exposed to a nearby light source. Clean the sensor and move the fixture away from reflective surfaces or other lights.
How often should I replace the battery?
Many rechargeable batteries in solar lights last one to three years. Replace the battery when runtime drops well below its original level, even after a full day of sun.
Can I leave the lights out in winter?
In most climates, yes. Clear snow from the panels when possible, and expect shorter runtimes during the season when days are shorter. Bring units indoors if the manufacturer recommends it for extreme cold.
Do solar lights work on cloudy days?
They charge more slowly under clouds but can still gather some energy. A string of overcast days may leave the battery partly charged, so runtime can drop until sun returns.
Can I use a tuffenough light in a shaded yard?
You can, but expect reduced performance. If the spot gets less than about four hours of direct sun a day, consider relocating the fixture or using a model with a separate remote panel that can be mounted in a sunnier spot.
Are solar outdoor lights safe to leave on all night?
Solar landscape lights are low-voltage and generally considered safe for outdoor use. For wiring-related questions or concerns about battery disposal, consult a qualified electrician or your local waste facility.
What should I do with a dead battery?
Do not throw rechargeable batteries in household trash. Take them to a battery recycling drop-off location, many of which are found at hardware and electronics stores.
Conclusion
Tuffenough solar outdoor lights can light your yard for years with very little effort. Choose a sunny spot, prepare and install each fixture carefully, and keep the panels clean and clear of growth. When a light underperforms, check the panel, mode, sensor, and battery in that order. For more ideas on small-scale solar lighting, browse our other guides on Top 5 DIY Solar Lights Outdoor Picks for Garden and Patio.
Related reading
- Top 8 Solar Lights for Balcony Options for Small Outdoor Spaces
- Top 5 Solar Lights Lanterns Outdoor Picks for Patios and Gardens
- Top 5 Outdoor Lamp Post Lights Solars for Patios and Driveways
- 6 Best Solar Wall Outdoor Lights for Porches and Patios (2026)
- 6 Best Solar Powered Outdoor Wall Lights for Porches and Patios (2026)
Ready to choose one?
About Claire Whitaker
Claire Whitaker is part of our editorial team and reviews and edits our small-scale solar guides, checking product details against manufacturer specifications and owner feedback.